jmeriaux
This user hasn't shared any biographical information
Homepage: http://ngc1976.org
Mars in early March 2010
Posted in Planets on March 9, 2010
This is probably my best photography of Mars even though it does not exhibit the side of mars with the most features. The seeing was great for my location (Alpo seeing 6/10). Mars was quite high in the sky. The conditions were as good as for the shot I took in November. Orographic clouds over Olympus Mons can be seen, and as well as albedo features such as Phlegra Montes, Phlegethon Catena and Amazonis Planitia. Picture taken at roughly f/d 40 using a 2.5x Siebert optics barlow with DMK B&K Camera – about 1,500 rgb frames – each frane between 1/10 and 1/15 sec of exposure.
For those who are wondering why it is possible to capture (when the seeing is great…) details that are at or sometime far below Dawe’s limit – look at the excellent article from Damien Peach on this topic, explaining why Dawe’s limit is not really applicable to extended objects (planetary disk) with high contrast features.

Saturn, Rhea and Tethys – February 2010
Posted in Astrophotography, Planets on March 3, 2010
Between two rainfalls – I was able to take this picture of Saturn with my Maksutov Cassegrain 7″ at focal plane f/d 15 with my DMK B&W camera. This is a composite picture from about 1100 RGB frames.
Notice from left to right two of Saturn’s satellites: Rhea (mag 9.9) and Tethys (mag 10.3). Cassini’s division is guessed but not very obvious since the rings have a low inclination. – The C ring is hinted on the left and right portion of the disk. Disk diameter is 19″.
Saturn is more challenging to image because of its low surface magnitude. On the Red channel I had to shot at a speed as low as 1/9 sec by image. Just finishing up shooting the blue channel, and clouds came over! Next time I’ll try to image at f/d 22 using a 1/5x barlow to bring more details.
Seeing: 4/10
Transparency: 2/6 (Full moon)
Shot on 2/28/2010 at 1.10am PST

Mars opposition – February 2010
Posted in Astrophotography, Planets on February 15, 2010
I was able to observe Mars this week end – after weeks and weeks of cloudy sky and rain. The seeing (between 4/10 and 5/10 on ALPO scale) was not as great as in November but I am still very pleased with the result I got in average seeing condition with my Orion Maksutov-Cassegrain 7″ – a mass production telescope I bought for less than $1,200 – and with my black and white Imaging source DMK camera.
Apparent diameter: 13.4″
Mars on 2/14/2010 at 00.43 AM PST – RGB Composite
I used registax 5 to combine about 2,000 rgb frames, and the following software : Photoshop CS4, Focus magic, and sharpener pro 3.0.
I used a x2.5 Siebert optics barlow – and the picture was taken at focal plane at approximatively f/d 40.
Calsky.com rendition of Mars for same date / time is on the right.

________________________________________________________
Mars – 02/13/2010 at 22.33 PST – RGB Composite

____________________________________________________________
Rendition of Mars on CalSky.com for the same date and time.

_____________________________________________________________
Red Channel Green Channel Blue Channel


Mars : tweaking my planetary imaging set up – November 2009
Posted in Articles, Astrophotography, Planets on December 5, 2009
Taken on 11/26/2009 between 3am and 5am at San Bruno, CA. Seeing: 6/10 (Alpo scale) – Transparency: 3/6 -Wind < 5Mpmh
Here are new pictures of Mars, shot at the end of November 2009. At this time, the disc was about 9.5″of diameter. For such a small target I had to tweak my planetary imaging set up to get better results. On the other hand, Mars is at a fairly high altitude, making it easier to deal with turbulence. There were few chromatic distortions (usually there when objects are lower on the horizon – e.g. for Jupiter in the 2009 opposition at my latitude).
Telescope: Orion Maksutov Cassegrain 7″ on Atlas Mount
Camera: DMK Imaging Source B&W with RGB Filters
Barlow: from Siebert optics – this is an excellent barlow that can be used for 1.5x, 2.5x or 3.5x power magnification. Even though the Maksutov is at f/d 15, a barlow is necessary to reach the maximum resolution. Given the space between the camera and the barlow due to the RGB filter wheel I estimate the “true” magnification I used this night to be over 2.5x, which brings the pixel resolution at less than 0.2″ by pixel with the DMK Camera.
Processing: Registax V5 (Frame combinations), Maxim DL5 (initial RBG alignment), Photoshop CS4 and Nik Sharpener Pro 3 for final image processing.
Mars – 11/26/2009 – 4.24AM – RGB composite (see green and red channel below)

____________________________________________________
Red channel : 4.24AM PST Green channel: 4.18 am PST

_____________________________________________________
Two more pictures, taken respectively by 3.44AM and 3.53AM PST


______________________________________________________
Some notes about the planetary imaging set up: I used the same Planetary set up as explained in this post, but in addition, I added a Meade Microfocuser to the configuration (Meade #1209 Zero Image-shift Microfocuser for Schmidt-Cassegrain).
I removed rhe flip mirror for increased rigidity and alignment of the camera body and filter wheel.
The space gained by removing the flip mirror allows having a reasonable distance between the barlow and the camera body.
When removing the flip mirror, it becomes indispensable to use the Microfocuser because you can focus without moving the primary mirror. Which means Mars stays in the field of view instead of jumping around when you focus with the maksutov cassegrain focuser. Otherwise you need a flip mirror to re-center the planet after focus: the field of view of the DMK camera is very small and you easily move the planet “out of target” when focusing.
In addition, the electric microfocuser allows a fine grain focus very hard to achieve with the manual focuser at the back of the Maksutov Cassegrain OTA. When doing planetary imaging at high F/D it is a must-have accessory…

Wide Field Pictures at Joshua Tree, CA – October 2009
Posted in Astrophotography, Deep sky objects on November 11, 2009
I recently bought a used Soligor Teleobjective lens on eBay for about $40 (!) and tried it out for Wide field astrophotography with my Canon Digital Rebel XTi (unmodified camera).
The Soligor is a 200mm F/D 3.5 Lens for 35mm SLR cameras. The Teleobjetive is lightweight – but gives impression of being very solid.
To use it with a Canon EOS Digital Camera you need an adapter that includes a lens.
Using an FD to EOS adapter usually extends the focal – in my case by 25% from 200mm to 250mm.
I took the following pictures at Joshua Tree, CA – under quite a dark sky on the 25th of October 2009.
The Lens was stopped at F/D 4. The Camera and Teleobjective were mounted on an Orion Onyx 72ED and an Orion Atlas M0unt.
Coma is still visible at the edge of the field. However, I am quite happy with the result given the cost of the lens, especially comparing it to the cost of a brand new Canon teleobjective …
Processing: MaxIm DL 5, Photoshop CS4, and Neat Image.
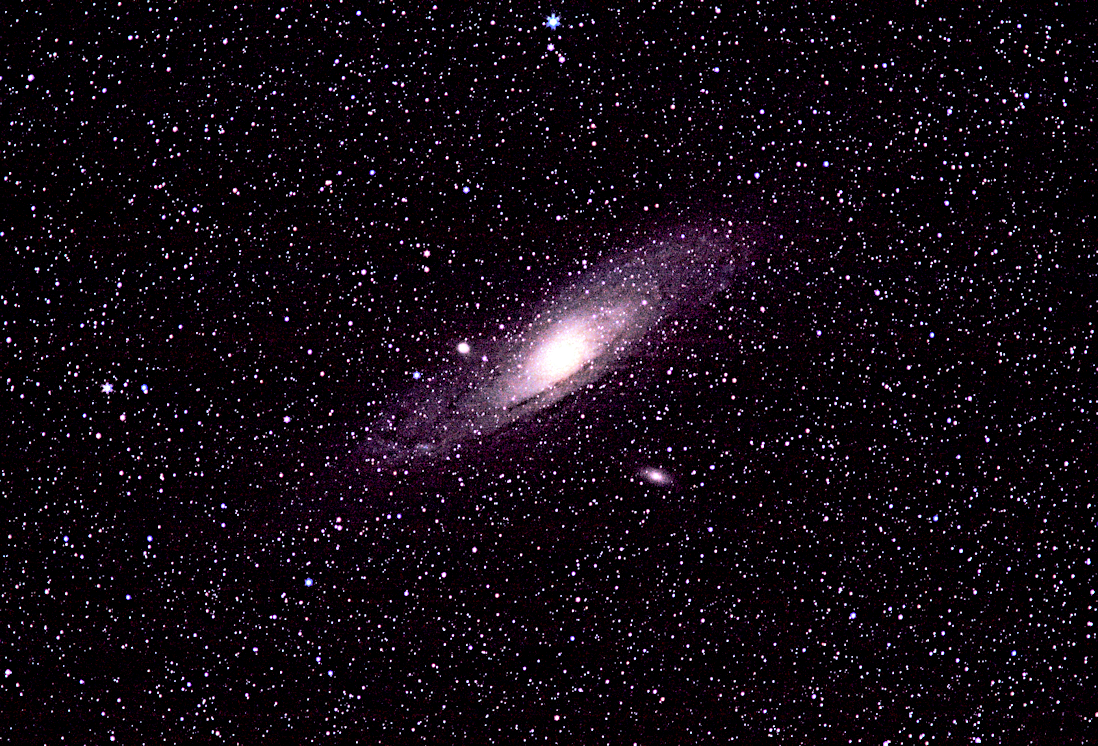
M31 – on 10/25/2009 – Soligor 200mm at F/D 4 – Digital rebel: 9 exposures of 104 sec.

M42 – 10 exposures of 104 sec – Soligor 200mm

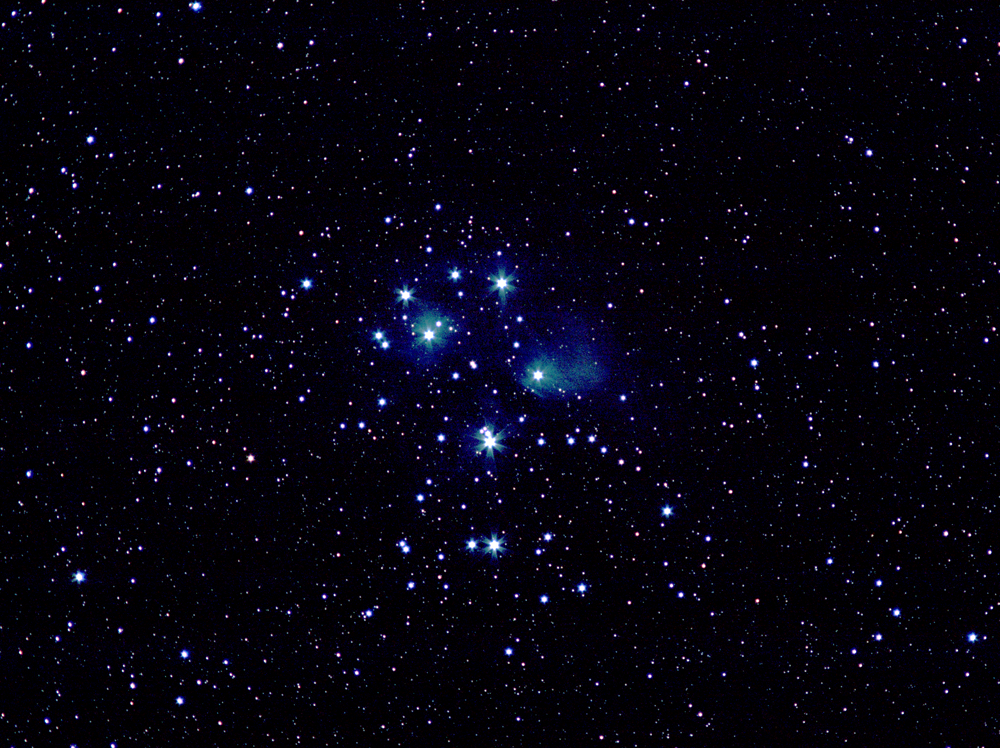
Pleiades – 8 exposures of 104 sec – Soligor 200mm and Digital Rebel XTi

Jupiter and a Joshua Tree after Sunset – 18/50mm Zoom – Canon XTi
Planetary astrophotography set up – Jupiter opposition August 2009
Posted in Articles, Astrophotography, Planets on September 12, 2009
I would like to present the astrophotography set up I used for the recent pictures of Jupiter I took during the Jupiter Opposition of August 2009. I found this set up to work quite well, allowing me to take quickly, and in a repeatable manner high resolution pictures (when the seeing allows it!).
This set up will work on any Telescope having enough in-focus travel, which is the case for Schmidt Cassegrain and Maksutov Cassegrain Telescopes.
Telescope and accessories
First, the Telescope: Orion Maksutov Cassegrain 7″ – on an Orion Atlas Mount attached to a Pier.
I am very happy with this telescope. The scope has to be placed outside 2h before observing to cool down, but otherwise the scope is very easy to set up, keep extremely well its collimation, and has a quite a good optical quality. I noticed also that once the tube reaches thermic equilibrium, the scope is less affected by Turbulence (most of the time) than my larger aperture telescope (SCT 9.25″) when the seeing is average or below average (3-4/10 on ALPO scale) – which is unfortunately the case most of the time at my location (San Bruno, CA).
Here are the accessories / cameras I use for this set up:
- 1 – Telrad unit, with Dew heater: the Telrad is very convenient to align the Telescope and/or point to bright objects. There is no need for a conventional Finder when doing planetary observation with a go-to scope! Note the Telrad gets foggy very quickly – the Dew heater is a must as soon as the temperature drops below the dew point. The dew heater was ordered at Agena AstroProducts
- 2 – Focusing knob: It is probably not as good as an electronic focuser, but it is cheap and does reasonably well the job. The focusing knob was ordered at ScopeStuff
- 3 – Orion Filter Wheel: a must to take RGB pictures, especially with a planet like Jupiter, having a very fast rotation. RGB pictures have to be taken within 3 to 4 minutes maximum with this Telescope, otherwise the effect of rotation is noticeable when integrating RGB channels.
- 4 – Flip Mirror: with this it is extremely convenient to center planets especially with a planetary Camera having usually quite small sensor sizes. The flip mirror was ordered at Orion.
- 5 – Imaging Source Camera DKF 21AU04.AS: this is a great B&W camera with a sensitive and high resolution chip. Maximum frame capture is 60 fps! The chip sensor is very small (1/4″) but it does not matter for high resolution planetary astrophotography. However the camera cannot really be used to capture large lunar landscapes, and the Flip mirror helps saving time to center the planet in the sensor field of view.
- 6 – NetBook Asus 2G Ram/160G Disk : even though the camera capture frames at high rate, since the resolution is 640×480 on 8 bits – the size of the AVI files for a 30-40sec movie is still small (compared to my Orion Solar System Imager Camera where the Asus had trouble handling the frame download rate). The Netbook is built like a Tank which is great on the field – and has a long battery life (+6 hours).

Being new to B&W CCD astrophotography, I found the following benefits for planetary photography compared to Color CMOS sensor such as the Orion Solar system imager III:
- b&w camera are usually more sensitive, minimizing the exposition time (even with RGB filters, compared to CMOS color cameras)
- taking exposures in each channel allow an optimal focus for R/G/B – quite useful especially when captured objects are low on the horizon, with extra color dispersion caused by the athmosphere
- There is no bayer matrix in front of the sensor – for the same sensor pixel resolution, black and white sensor with RGB capture will produce more detailed images
- No bayer matrix and IR filter in front of the sensor gives complete control / more options when choosing which combination of filters to use
On the cons side, taking RGB pictures takes extra captures that have to be done in limited time (at least for Jupiter) and some extra processing time, but this is far out weighted by the benefits…
Image Processing
In terms of AVI/ picture processing I use the following software:
- Registax V5 for making composite images for each RGB channel.
- Max DSLR for aligning and combining RGB channels
- Occasionally, Astra Image 3.0SI for their great deconvolution utility
- PaintShop pro photo X2 for final processing: image rotation, cropping, histogram adjustment, and color adustments. PaintShop pro does the job and is less expensive than PhotoShop.
Voila !
Jupiter Opposition – 25th of August 2009
Posted in Astrophotography, Planets on September 12, 2009
The seeing was bad this day (3/10) but the Great Red Spot, Io’s disk and its shadow were visible.
It seems to me the seeing was better in Early August, when Jupiter was culminating early in the morning …
Location: San Bruno, CA – Telescope: Orion Maksutov Cassegrain 7″ with Atlas Mount
CCD Camera Imaging Source DKF 21AU04.AS with RGB color wheel
Picture at Focal Plane F/D 15. All pictures are processed with Registax, Maxim DSLR, and Paintshop Pro


